Set up a meeting room display
This guide takes one meeting room from a freshly connected calendar account to a TRMNL screen beside the door, with Booking with TRMNL enabled.
It resumes at the point where a Google or Microsoft account is already connected. If nothing is connected yet, start with the Google Workspace administrator guide or the Microsoft Exchange administrator guide, then return here.
Before you start
- A connected Google or Microsoft integration that has synchronized at least once.
- A TRMNL device claimed by your account.
- Your own sign-in. The installation owner is its only manager, so the person following this guide should be the person who installed Booking.
Work through the steps in order. Each one ends with something you can see on screen.
1. Select the room for synchronization
Booking only manages the calendars you select on the integration.
- Open Apps > Booking > Integrations.
- Select Edit on the connected account or workspace.
- Under Synchronized Calendars, select the room.
- Select Save changes.
The first synchronization selects every discovered calendar for you. After that, newly discovered calendars arrive unselected — a room created at the provider last week stays hidden until someone selects it here. This is the most common reason a room is missing from Calendars.
If the list is empty, select Synchronize and check again. A room created at the provider can take up to 24 hours to appear.
Select only what a display needs. Clearing a calendar stops its synchronization, removes it from Calendars, and destroys its display assignments and collection membership. Re-selecting it later does not restore them.
2. Open the room
Open Apps > Booking > Calendars. Rooms are grouped by provider — Google Workspace Resources, Microsoft Exchange Resources, and the personal and iCal equivalents. Select the room to open its page.
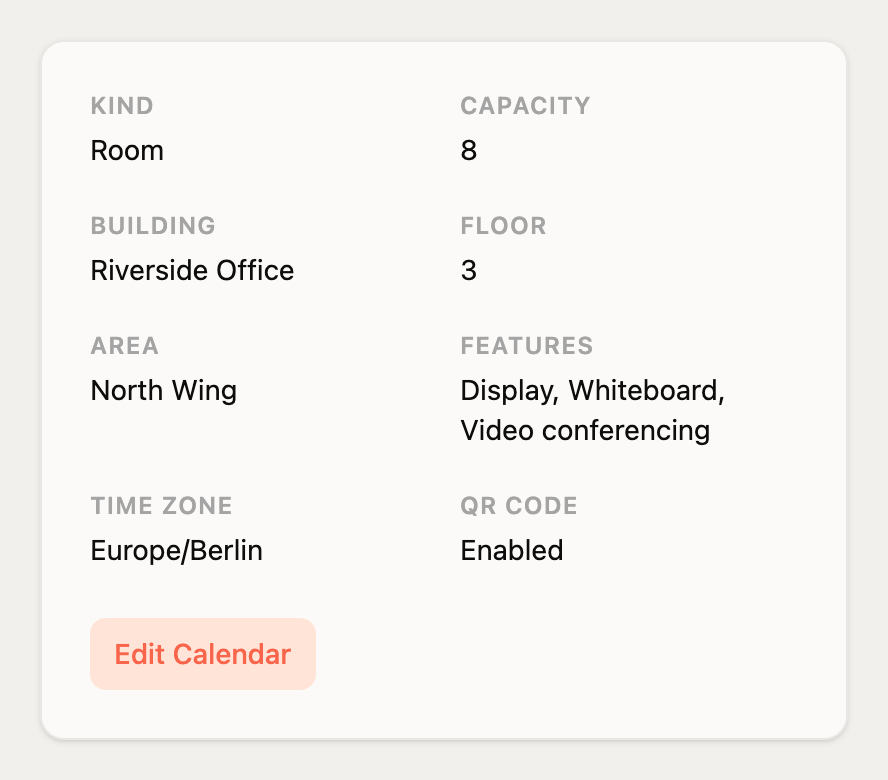
The page has three parts:
- Details: Kind, Capacity, Building, Floor, Area, Features, Time Zone, and whether the QR code is enabled. Only the fields your provider supplies are shown. Edit Calendar opens the form used in steps 3 and 7.
- Displays: the devices showing this room. Step 5 uses this card.
- Calendar Schedule: the current state — Available now, In use until, or Booked for the day — followed by Upcoming bookings and a Last synced timestamp.
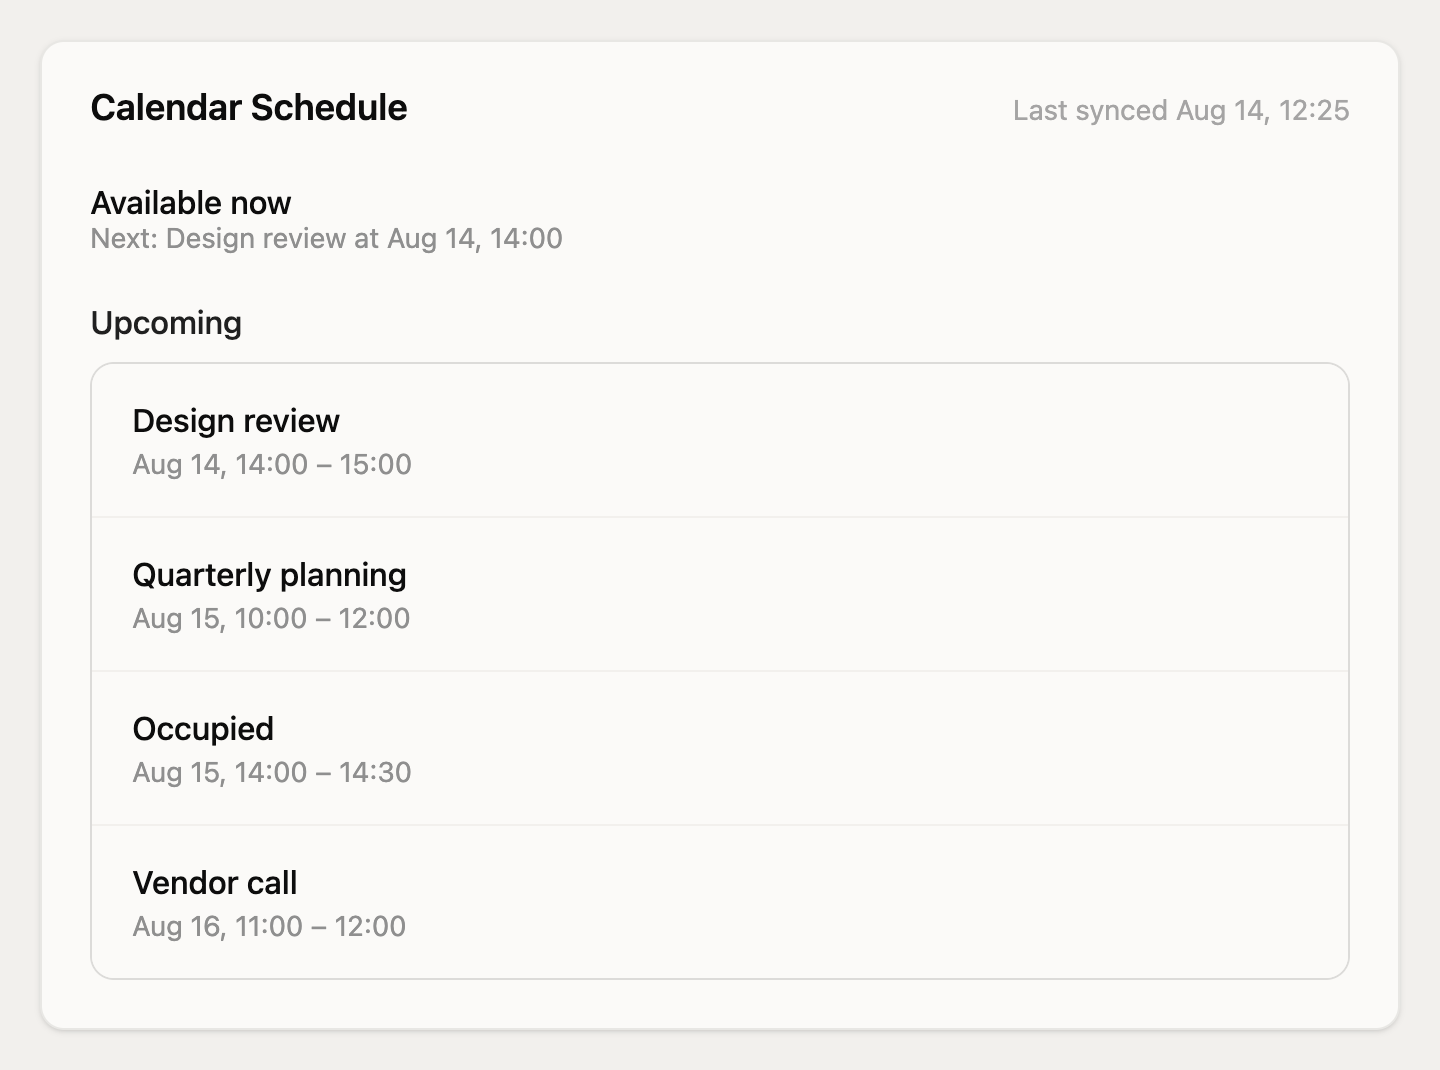
Opening this page refreshes the room from the provider, so reloading it is the quickest way to confirm a change made in Google or Microsoft has reached TRMNL. Between visits, a background job refreshes each selected calendar roughly every five minutes.
A Sync Error banner at the top means the provider rejected the last request. Select Review integration and resolve it before continuing — nothing downstream in this guide will work reliably until synchronization succeeds.
3. Name the room for the display
The name shown here is also the name shown on the device, so make it read well from a few metres away.
- Select Edit Calendar.
- Enter an Override name. Leave it blank to keep the name from the integration.
- Select Save changes.
Prefer what a visitor standing in the corridor would call the room — Kestrel or 3F Boardroom rather than conf-3f-boardroom@example.com.
On a Google or Microsoft calendar, Capacity, Time Zone, and Remote ID are disabled and greyed out under the notice Some fields are managed by the integration. Those values come from the provider; change them at the provider and synchronize. Only an iCal calendar exposes them for editing.
4. Check the time zone
The room page always shows the Time Zone actually in use. Check it now — a wrong zone is easy to miss on a dashboard and obvious on a wall display.
TRMNL resolves it in this order, taking the first value that is set:
- The installation-wide Time Zone setting.
- The calendar's own time zone, supplied by the provider.
- The installation owner's account time zone.
- UTC.
Usually the provider's value is correct and there is nothing to do. Look more closely when the room is a Microsoft Outlook personal calendar (Microsoft returns no time zone for these), when a resource has no location data at the provider, or when the display hangs in a different zone from the account owner.
To set one zone for every room:
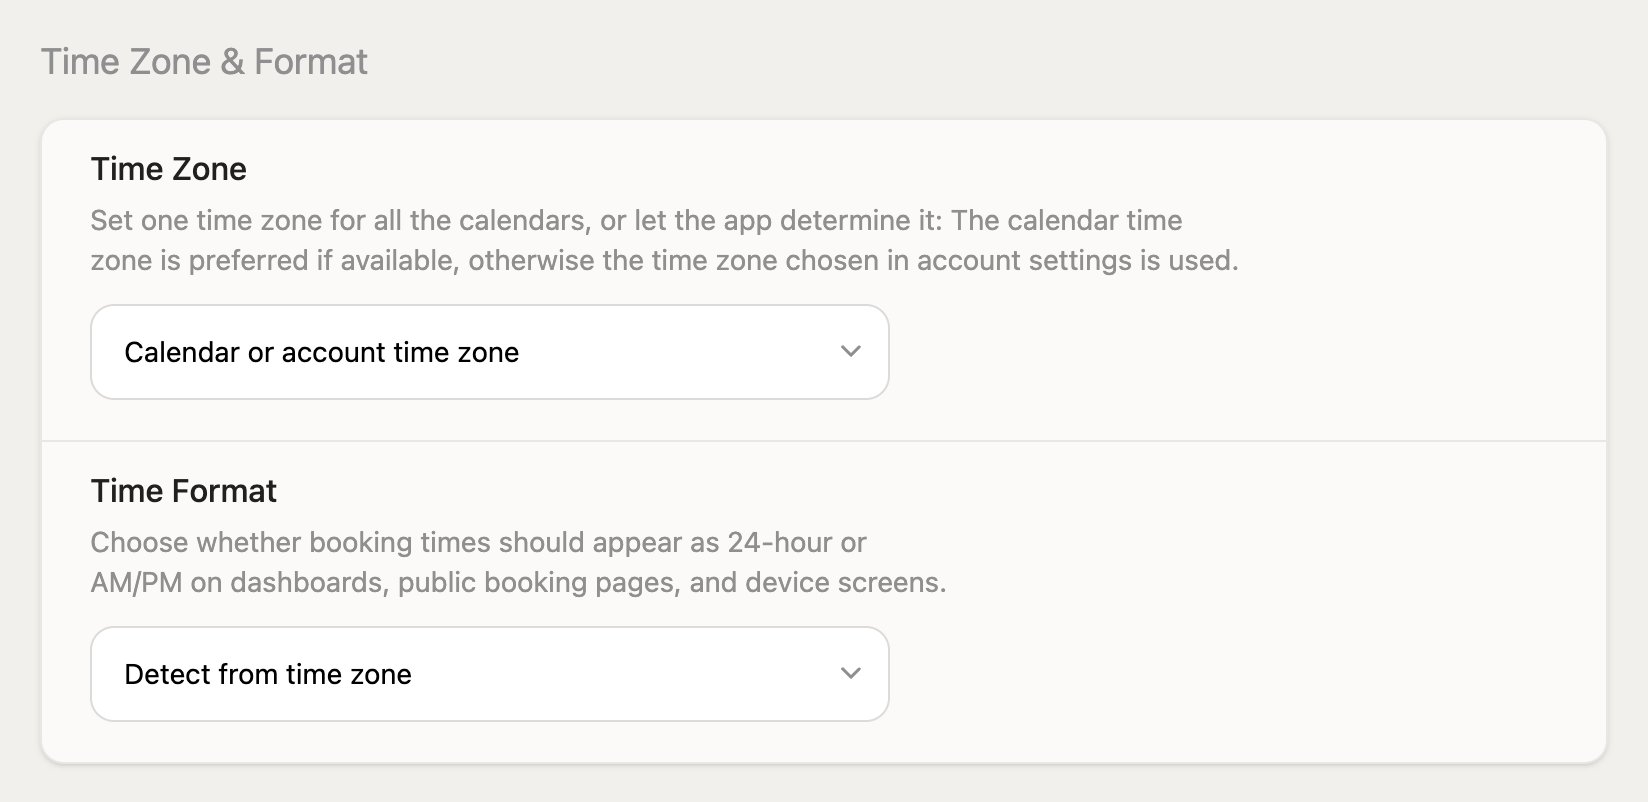
- Open Apps > Booking > Settings.
- Under Time Zone & Format, choose a Time Zone. The default, Calendar or account time zone, keeps the resolution order above.
- Optionally set Time Format — Detect from time zone, 24-hour format, or AM/PM format.
- Select Save changes.
An installation Time Zone overrides every calendar's own zone, including values supplied by the provider. That is what you want for an office in one city, and what you do not want for rooms in several countries — there, leave the setting on Calendar or account time zone and let each room keep its own.
Return to the room page and confirm Time Zone and the times under Upcoming now read correctly.
5. Add the room to a device
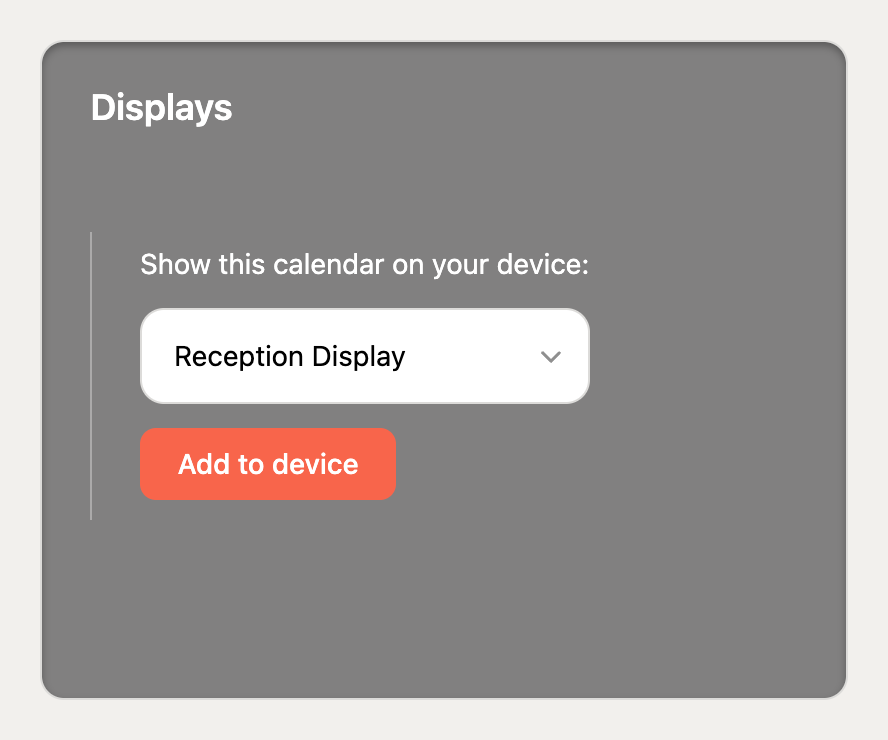
- On the room page, find the Displays card.
- Under Show this calendar on your device, choose the device.
- Select Add to device.
A confirmation reads <Room> is now showing on <Device>. and the device appears in the card with a thumbnail of its current screen. Until the device next renders, the thumbnail reads Not rendered yet.
A few things worth knowing about this card:
- Selecting your own thumbnail opens that device's display settings.
- Remove stops showing the room on that device. It does not delete the calendar or touch the provider.
- Adding the same device twice does nothing — a room appears at most once per device.
- One room can go on several devices, and one device can be added again later from another device's entry.
- A display added by a different manager appears as a read-only entry badged other manager.
6. Make it a dedicated room display
Adding the room puts one item into the device's playlist. If that device already runs other plugins, it will keep rotating through them and the room will only be on screen part of the time — which is not what anyone standing at the door expects.
For a display dedicated to one room, open that device's playlist and remove the other items, so the room screen is the only thing it shows.
Two device settings are worth a look while you are there. Open Devices and select the device:
- Refresh Rate, under Battery & Sleep, controls how often the device wakes and fetches a new screen. The room screen itself is regenerated every five minutes and that interval is fixed, so a device refresh slower than five minutes is what limits how fresh the door display looks. Faster refresh costs battery life; a mains-powered room display can afford it.
- Presentation holds orientation and the color palette. If you have enabled a company logo, see Branding for the palette each device model needs.
7. Turn on Booking with TRMNL
Booking with TRMNL lets someone reserve the room by scanning the QR code on the screen, with no TRMNL or calendar account. It takes two switches: one for the installation, one for the room.
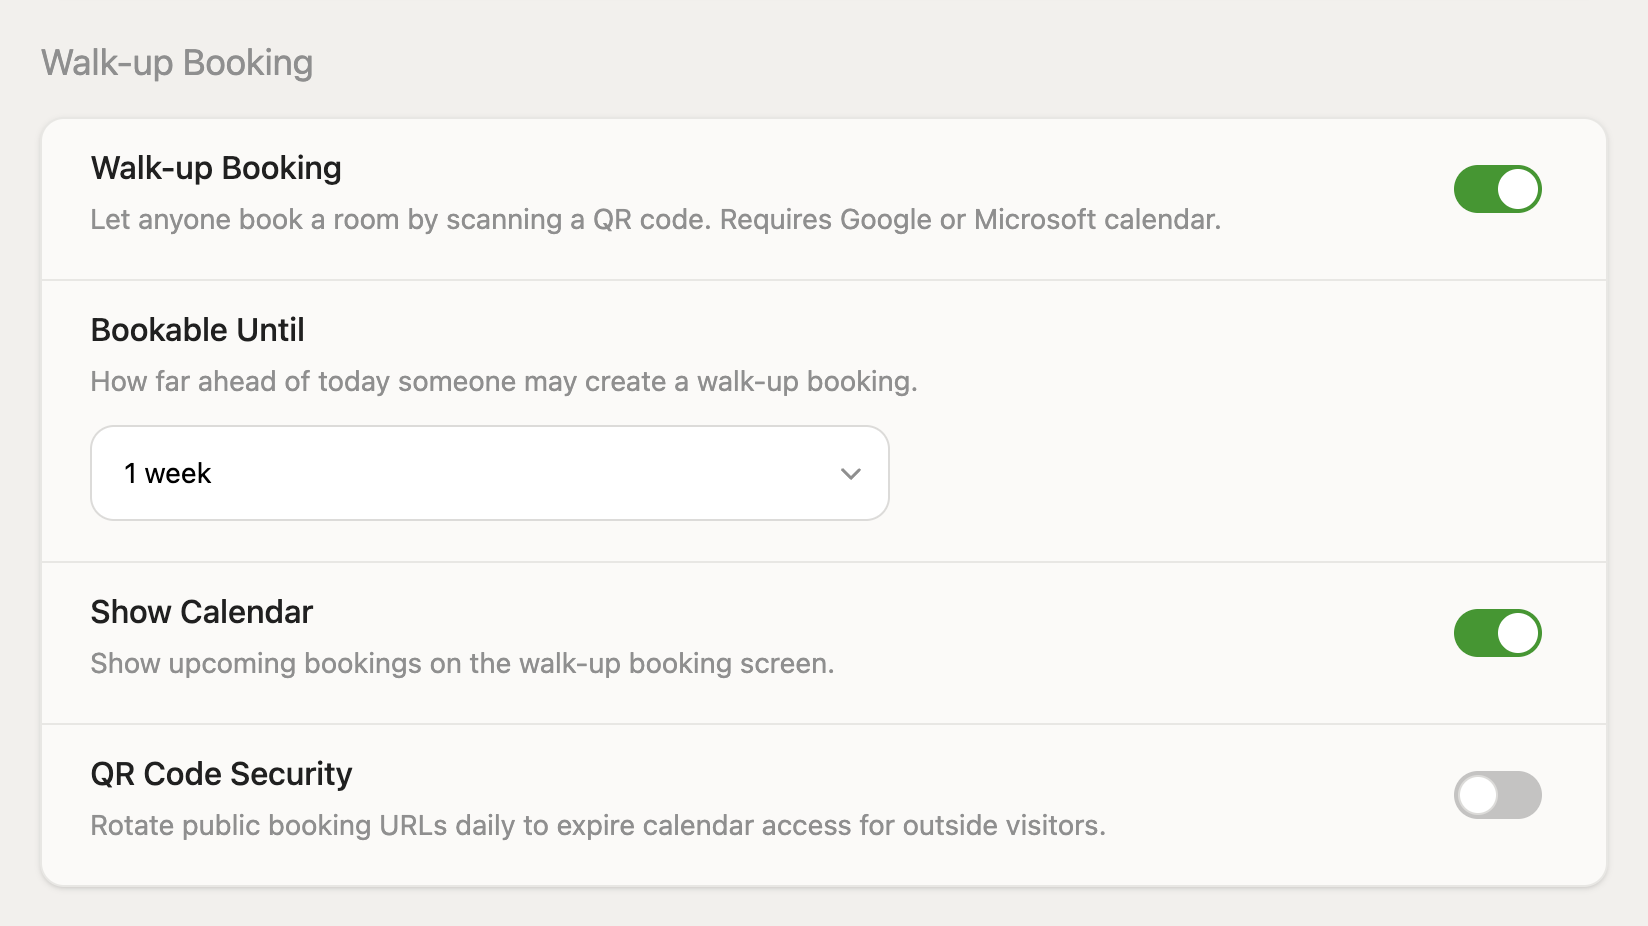
First, the installation:
- Open Apps > Booking > Settings.
- In the Booking with TRMNL section, turn on Allow booking on the spot.
- Set Bookable Until — how far ahead of today a visitor may reserve: 1 day, 2 days, 1 week (the default), or 1 month.
- Leave Show Calendar on to let visitors see the next seven days of bookings, or turn it off to publish a booking form that never reveals the schedule.
- Decide on QR Code Security, which rotates each public booking URL daily. Leave it off if you intend to print the code — see step 8.
- Select Save changes.
Then the room:
- Return to the room and select Edit Calendar.
- Turn on Show booking QR code.
- Select Save changes.
Both switches must be on before a QR appears. The calendar must also be a Google or Microsoft calendar that is selected under Synchronized Calendars and that the connected account can write to. iCal feeds are read-only and never offer Booking with TRMNL.
Booking with TRMNL covers the visitor's side, conflict handling, and the full security model.
8. Post the booking code
With Booking with TRMNL available, the room page shows a QR code linking to the public booking page. Select it to open that page yourself and check it.
To put a code somewhere other than the screen, select Print booking code and print the sheet.
The print link disappears while QR Code Security is enabled, because daily rotation would invalidate the printed copy overnight. Choose one or the other: rotation for on-screen codes, which always show the current day's URL, or a printed code with rotation off.
Test a printed code with a phone before posting it. Small codes, reflective covers, low light, and distance all make scanning unreliable.
9. Verify the display
Walk through the whole path once, at the door:
Confirm the device shows the room name and its current state.
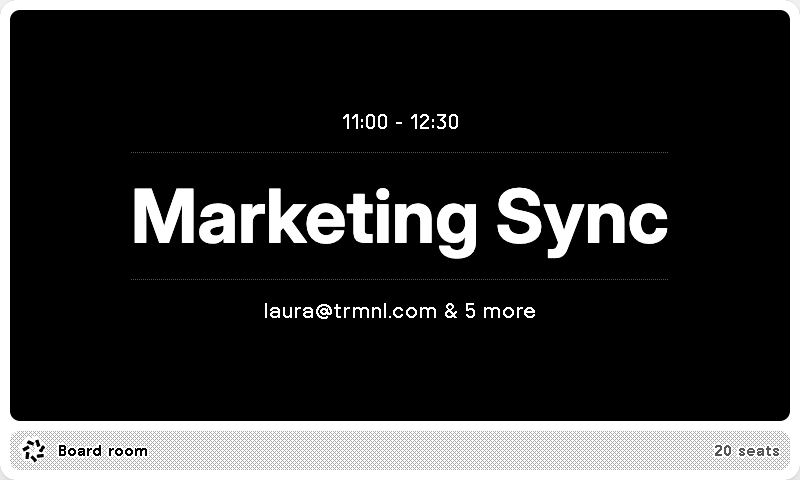
Create a test meeting on the room in Google or Microsoft, then reload the room page in TRMNL and confirm it appears under Upcoming within a few minutes.
- Scan the QR code with a phone and reserve 15 minutes.
- Confirm the screen changes to occupied at the device's next refresh.
- Cancel the test booking from the room page: Cancel for a future booking, End for one already running.
Only bookings created through TRMNL can be cancelled from TRMNL. Meetings created in Google or Microsoft have no button and must be changed at the provider.
Troubleshooting
| Symptom | Check |
|---|---|
| The room is missing from Calendars | It is not selected under Synchronized Calendars — calendars discovered after the first synchronization arrive unselected. Synchronize the integration and select it. |
| The device shows other plugins as well as the room | The room is one item in that device's playlist. Remove the other items to dedicate the device to the room. |
| The device screen still reads Not rendered yet | The device has not checked in since the room was added. Wait for its next refresh, or confirm it is online. |
| Times are wrong by a fixed number of hours | Check Time Zone on the room page, then whether an installation-wide Time Zone is overriding the provider's value. |
| Times use the wrong clock format | Set Time Format under Settings > Time Zone & Format instead of relying on detection. |
| No QR code appears | Allow booking on the spot and the room's Show booking QR code must both be on, and the room must be a writable Google or Microsoft calendar selected under Synchronized Calendars. |
| Print booking code is missing | QR Code Security is enabled, or the room is not available for public booking. |
| The schedule is stale | Reload the room page — it refreshes from the provider — then check Last synced and any Sync Error banner. |
| A booking cannot be cancelled from TRMNL | It was created at the provider, not through TRMNL. Change it in Google or Microsoft. |
Show the room in a browser
In Displays, select Other (via URL) and click Add to device. Open the resulting /booking_screen/:code URL on an LCD or other browser display. Each calendar can have one URL display alongside its TRMNL devices. The page refreshes automatically and shows the current room state.
URL displays use the same per-calendar billing rule. Showing the room on a URL display and a TRMNL device counts the calendar once. Use Copy URL to copy the address and Remove to stop URL access.
Related documentation
- TRMNL Booking overview
- Booking with TRMNL
- Resource collections — for showing several rooms on one screen
- Branding
- Google Workspace administrator guide
- Microsoft Exchange administrator guide